
How to Measure for Compression Stockings: Step-by-Step Sizing Guide
By Sean Tang
Published: September 9, 2026 | Last reviewed: September 2026
To measure for compression stockings, measure your bare leg first thing in the morning before swelling: ankle circumference at the narrowest point above the ankle bone, calf circumference at the widest point, and leg length from floor to the bend of the knee (seated, knee at 90°). Match all three numbers to the brand’s size chart — if you fall between sizes, the calf usually decides fit.
Here’s the thing about compression stockings: they’re not like ordinary socks. A $12 pair of athletic socks forgives a sloppy fit. A 20–30 mmHg compression stocking doesn’t. Order the wrong size and you’ll either get a garment that slides down by noon, or one that squeezes like a tourniquet and ends up in a drawer forever. Either way, the money’s gone and so is the therapeutic benefit your provider prescribed.
In a hurry? Our quick step-by-step measuring guide gets you through the tape work in about five minutes. This post is the deeper version — it explains why each measurement matters, when to measure, and how to handle Petite vs. Regular vs. Tall lengths, which is where most online buyers go wrong. For the bigger picture — levels, styles, and fabrics — our guide to choosing compression stockings is the natural next read.
Once you have your three numbers, browse JOBST Relief compression stockings — available in Petite and Regular, so your floor-to-knee measurement actually decides your SKU.
Before we grab the tape, one quick note:
This content is for educational and informational purposes only. It is not a substitute for professional medical advice, diagnosis, or treatment. Always consult your healthcare provider about the compression level and fit that’s right for you.
Why Correct Sizing Matters More Than the Compression Level
Most people shopping for their first pair obsess over the mmHg number — 15–20, 20–30, 30–40 — and treat sizing as an afterthought. That backwards thinking is why so many first-time buyers end up with stockings they never wear.
Compression stockings use graduated compression: the fabric applies the most pressure at the ankle and gradually less pressure as it moves up the leg, encouraging blood to flow back toward the heart. That gradient only works if the garment’s measurements match your leg’s geometry. A size too small doesn’t just feel tighter — it can over-compress and create a tourniquet effect that restricts circulation. A size too large slides down, bunches behind the knee, and delivers almost no gradient at all. The mmHg printed on the box assumes a correct fit. Miss the fit, and the number is fiction.
This is also why sizing yourself by height-weight charts or shoe size fails (more on that below). Circumference is everything.
What You’ll Need Before You Measure
Gathering the right tools takes about a minute:
- A soft, flexible tape measure — the sewing kind, not the metal hardware-store kind. Metal won’t follow the curve of your leg.
- Paper and pen, or your phone’s notes app — you’ll write down three numbers plus the date and time of day.
- A firm chair — needed for the length measurement.
- A morning time slot — ideally within an hour of getting up.
Two shortcuts to avoid: never measure over pants or leggings (fabric adds millimeters that matter at these tolerances), and don’t wrap a piece of string around your leg and then measure the string. It’s an okay fallback in a pinch, but it introduces slack and error — the tape measure lying flat against skin is the gold standard.
When to Measure (And Why Morning Matters)
How swelling changes your numbers
Venous insufficiency, long sitting or standing, heat, and even salty meals make legs swell over the course of a day. Mayo Clinic’s fitting guidance recommends taking compression measurements “when your legs are not swollen… early in the morning, just after getting out of bed.” A calf that’s 16 inches at 7 a.m. may measure 16.5 or 17 by late afternoon — and on a compression chart, that half inch can move you into a completely different size class.
Buying stockings from an afternoon measurement is one of the most common reasons new stockings feel “fine at first, loose by morning.”
What to do if you can only measure in the afternoon
Life happens. If morning measuring isn’t possible, rest with your legs elevated above heart level for about 15 minutes before you measure — this helps drain some accumulated fluid. Second option: if your provider’s office or a fitter measured you in the morning, use that measurement on file rather than a self-taken afternoon number.
Step-by-Step: Measuring for Knee-High Stockings
Knee-highs are where most people start, and they’re genuinely DIY-friendly. Here’s the full sequence:
Step 1 — Ankle circumference
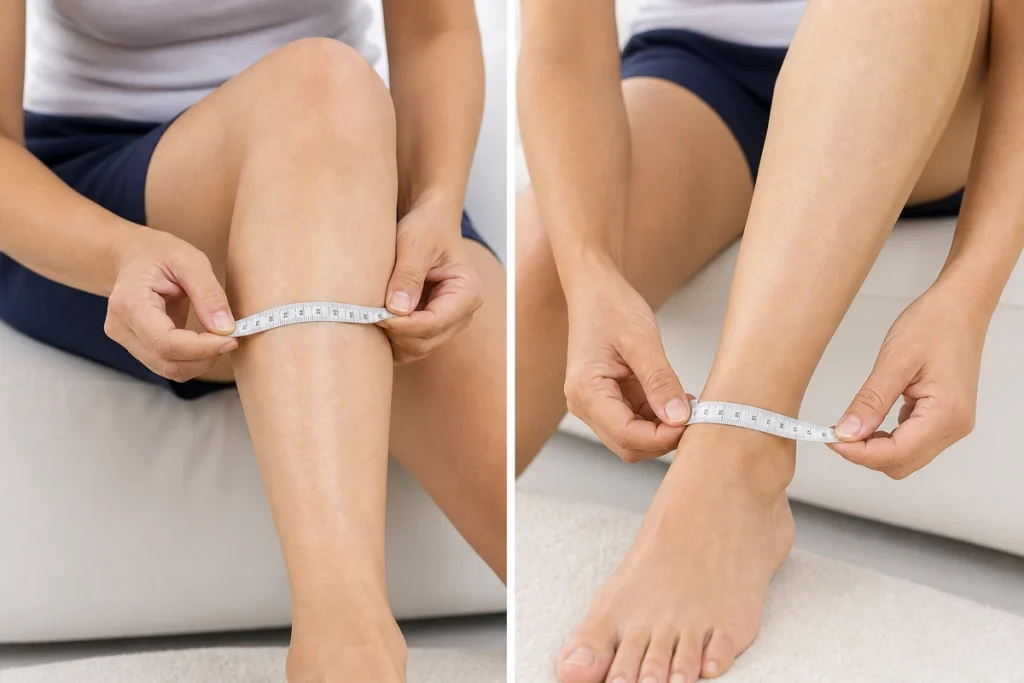
Wrap the tape around the narrowest point of your ankle, just above the ankle bone. Keep the tape snug and flat against the skin — not digging in, not hanging loose. Your foot should be flat on the floor, not pointed. Write the number down.
Step 2 — Calf circumference
Find the widest point of your calf — for most people it sits roughly midway between the ankle and the knee. Wrap the tape horizontally around the full circumference. Stand with your weight evenly on both legs (or sit with feet flat). This number usually decides whether a stocking feels too tight or too loose.
Step 3 — Leg length
Sit on a firm chair with your knee bent at 90 degrees and your foot flat on the floor. Measure along the inside or back of the leg from the floor up to the bend of the knee. This is your floor-to-knee-bend length, and it’s the number that determines Petite, Regular, or Tall.
Step 4 — Match to the JOBST size chart
Take all three numbers to the size chart for the specific product line you’re buying. The ankle circumference determines your size class, the calf confirms it, and the length picks your Petite/Regular/Tall variant. Every JOBST listing on our site prints the full chart on the product page — measure once, match once.
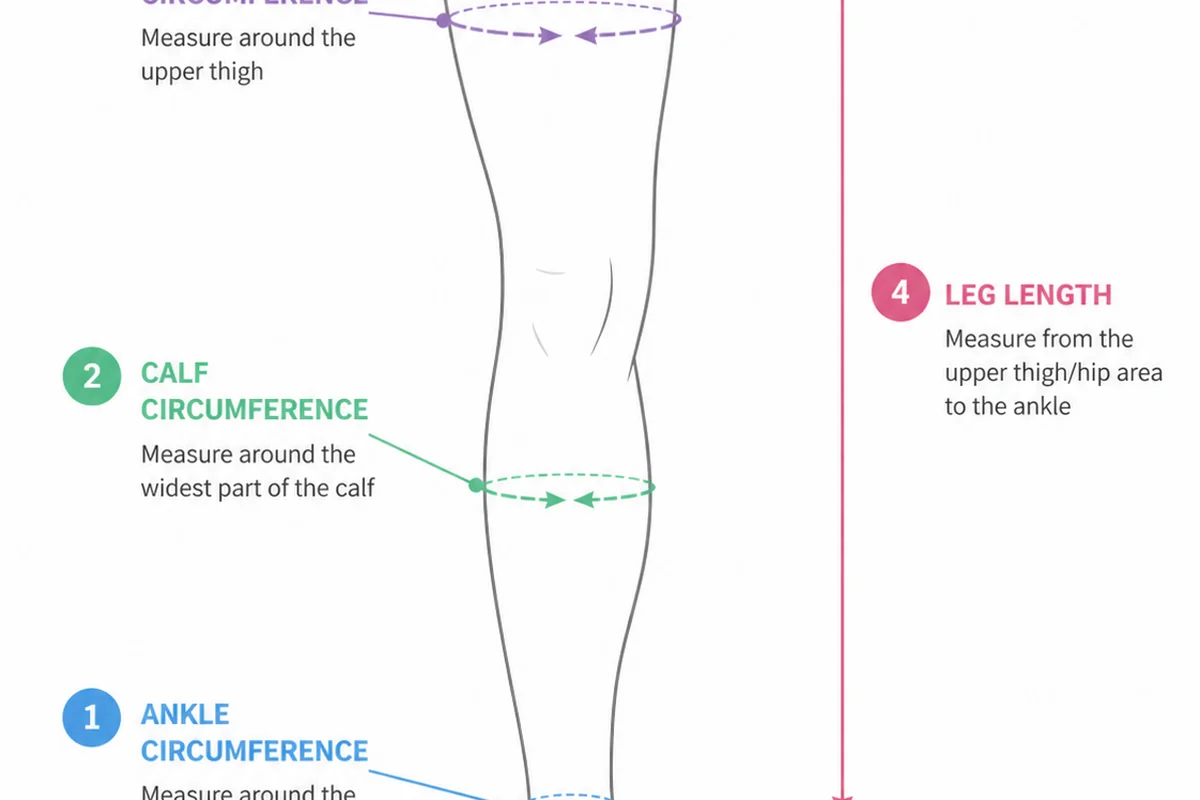
| Your measurement | Where to measure | What it decides |
|---|---|---|
| Ankle circumference | Narrowest point above the ankle bone | Your size class (the chart’s core row) |
| Calf circumference | Widest point, ~midway between ankle and knee | Whether the fit runs tight or loose |
| Leg length | Floor to bend of knee, seated at 90° | Petite vs. Regular vs. Tall length |
Petite vs. Regular vs. Tall: Getting the Length Right
Here’s the sizing detail most guides bury in a footnote — and the one that causes the most “the top band keeps rolling down” complaints we hear.
The floor-to-knee-bend rule
On typical JOBST knee-high size charts, the floor-to-knee-bend length classes break down like this:
- 15 inches or less → Petite
- More than 15 inches → Regular
- Around 19.75 inches and up → Tall
Treat these as typical JOBST classes, not universal law — thresholds vary slightly by product line (Relief vs. UltraSheer vs. Activa), so always check the chart printed on your specific product’s page. The circumference ranges stay the same across lengths; only the leg length changes. Shop JOBST Relief Petite for legs 15 inches and under, or browse Regular and Tall lengths in the full Relief collection.
What happens if the length is wrong
Fit problems from a wrong length show up fast. A petite wearer in a Regular stocking gets excess fabric bunched behind the knee — uncomfortable in a chair and a top band that rolls down with every step. A tall wearer in a Regular feels constant downward pull, and the top band digs into the crease of the knee instead of sitting just below it. Neither problem is fixed by a different compression level; both are fixed by the right length.
Length vs. shoe size
One more common mistake: choosing compression stockings by shoe size. Shoe size says nothing about calf circumference or leg length, and JOBST sizing is unisex and purely circumference-based. Two people who both wear a size 9 shoe can easily need different size classes and different lengths. Always measure; never assume.
Measuring for Thigh-Highs, Pantyhose, and Arms (Briefly)
Knee-highs cover most prescriptions, but not all. The logic stays the same — measure circumference at the relevant points, then match the chart:
- Thigh-highs: add a thigh circumference measurement at the widest point. JOBST lines like Bella and Ambition offer thigh-high styles.
- Waist-high pantyhose: add hip/gluteal circumference; check the chart for where thigh and hip measurements land.
- Arm sleeves: measure wrist, mid-forearm, and mid-upper-arm circumferences.
For these styles, the fitter question matters more (see below), and our find your perfect JOBST fit page walks through style selection line by line.
Common Measuring Mistakes (And How to Fix Them)
After helping fitters for years, we’ve seen the same handful of errors again and again:
- Measuring over clothing. Even thin leggings add millimeters. Fix: bare skin, always.
- Measuring at night. Evening swelling inflates your numbers. Fix: morning, or 15 minutes with legs elevated first.
- Tape too tight or too loose. Fix: flat against the skin, with one finger able to slide underneath.
- Measuring the wrong calf spot. Too low near the ankle understates your size. Fix: find the true widest point.
- Guessing instead of measuring. “I think I’m a Medium” is how tourniquet-effect returns happen. Fix: three numbers, written down.
- Using height-weight or shoe-size charts. These don’t measure your legs. Fix: the tape measure, every time.
Between Sizes? How to Choose
Ankle vs. calf conflict
Sometimes the ankle points to one size class and the calf to another. The general rule: prioritize the larger circumference for comfort and safe compression, unless your provider directs otherwise. Never size down into a smaller class hoping the fabric will stretch to fit — under-sizing is what creates a tourniquet effect. Sheer lines also show fit problems fastest, so if you’re between sizes and prefer a dress-sheer look, check the full JOBST UltraSheer collection size range carefully.
When to consider made-to-measure
If you have severe lymphedema, significant asymmetry between legs, or a leg shape that simply doesn’t match any chart row, made-to-measure garments are worth discussing with your provider. Our find your perfect JOBST fit page covers the custom route.
Should You Measure Yourself or See a Professional Fitter?
DIY works well when: your legs are fairly standard in shape, you’re being fitted for 15–20 or 20–30 mmHg knee-highs, and you can comfortably reach and wrap your own calf. That’s most people, and it’s why guides like this one exist. JOBST for Men sizing follows the same unisex circumference charts, so the process is identical for male buyers.
See a certified fitter when: you’re prescribed 30–40 mmHg or higher, you’re post-surgical, you have lymphedema or lipedema, you have diabetes with neuropathy, you can’t bend comfortably, you’re pregnant with rapidly changing measurements, or one leg swells significantly more than the other. Many insurance plans cover the fitting.
After You Measure: Next Steps
Three numbers aren’t much help if you lose them. Write down your ankle, calf, and length measurements, plus the date and time of day you took them. Re-measure every 6–12 months, and sooner after significant weight change, pregnancy, or surgery. Garments also relax with wear, so compare your numbers to a new garment, not your stretched-out old pair.
Then shop by chart, not by S/M/L habit. If you haven’t settled on a compression level yet, our guide on which compression level is right for you pairs naturally with your new measurements — size and level together determine the right garment.
Frequently Asked Questions
Can I measure myself for compression stockings?
Yes. Most people can self-measure knee-high stockings with a soft tape measure, a chair, and a morning time slot. You’ll need ankle circumference, calf circumference, and floor-to-knee length. If you wear 30–40 mmHg or higher, have lymphedema, or can’t bend comfortably, a certified fitter is the safer route.
What is the difference between Petite and Regular compression stockings?
Petite knee-highs fit a floor-to-knee-bend length of about 15 inches or less; Regular fits longer legs, and Tall classes begin around 19.75 inches on many JOBST charts. The circumference range is the same — only leg length changes. The wrong length causes bunching behind the knee or a top band that rolls down.
Is it better to size up or down in compression stockings?
Generally neither — match the size chart exactly. If you fall between sizes, the calf measurement usually determines whether the garment feels too tight or too loose. Never size down hoping the fabric will stretch; under-sizing can create a tourniquet effect. When in doubt, confirm with your provider.
When is the best time of day to measure for compression stockings?
First thing in the morning, before standing and before swelling develops. Afternoon measurements can overstate your size, producing stockings that feel loose by the next morning. If you must measure later in the day, rest with your legs elevated for 15 minutes first.
How often should I re-measure for compression stockings?
Re-measure every 6–12 months, and sooner after significant weight change, pregnancy, surgery, or a change in swelling patterns. Compression garments also relax with wear, so compare your measurements against a new garment — not a stretched-out old pair.
Do I need a professional fitting for 20-30 mmHg stockings?
Not necessarily. 20–30 mmHg knee-highs can usually be self-sized using ankle and calf measurements. Professional fitting is more strongly recommended for 30–40+ mmHg, post-surgical or lymphedema patients, diabetes with neuropathy, and anyone whose legs are difficult to measure accurately.
The Right Size Is the Whole Point
Let’s bring it back to the three numbers: ankle circumference, calf circumference, and floor-to-bend-of-knee length — measured on bare skin, in the morning, tape flat. Match those to the chart for your specific JOBST line, let the calf break any between-sizes tie, and let the length pick your Petite, Regular, or Tall. Do that and the compression level on the box actually means something.
Ready to buy? Start with our JOBST Relief collection in Petite, Regular, and standard lengths — every listing prints the full size chart on the page. If you’re still deciding on a garment, our pillar guide on how to choose the right compression stockings covers levels, styles, and materials end to end.
One last practical tip: new to compression? Grab a pair of donning gloves and stocking donners with your first order — they make application dramatically easier and protect the fabric from snags.
Related articles:
- How to Choose the Right Compression Stockings — the pillar guide: levels, styles, fabrics
- Donning Aids for Compression Garments — gloves, donners, and application technique
- Which Compression Level Is Right for You — pair your measurements with the right mmHg
Disclaimer: This content is for educational and informational purposes only. It is not a substitute for professional medical advice, diagnosis, or treatment. Always consult your healthcare provider before starting any new treatment. If you have a medical emergency, call 911 or your local emergency services immediately.

About the Author
Sean Tang is the founder of jobstcompressionstocking.com and has spent over a decade helping customers find the right compression therapy products. He works directly with JOBST-certified fitting principles and reviews every sizing guide against current manufacturer charts. Learn more about Sean.